Kevin Ian Schmidt

Guide to Using SharePoint as Your Department Information Hub

In today’s dynamic workplace, scattered docs and siloed knowledge are kryptonite to company success. But fear not, collaboration champions! SharePoint, the hidden gem within the Microsoft 365 realm, is here to swoop in and save the day. This guide isn’t just about manuals and menus; it’s your roadmap to transforming SharePoint into a vibrant information hub that empowers your team to conquer any project.

Imagine this:

  • One-stop shop for everything: Ditch the endless email threads and file hunts. Create a central repository for policies, procedures, project documents, even team photos – all accessible with a single click.
  • Knowledge power: Unmask your department’s hidden experts. Build wikis, Q&A forums, and knowledge bases, fostering information sharing and turning everyone into a resource.
  • Goodbye, communication chaos: Break down silo walls with team site features like announcements, news feeds, and chat channels. Keep everyone in the loop, on the same page, and singing in key.
  • Tailored workflows, seamless collaboration: Forget clunky processes and lost approvals. Design custom workflows for document revisions, task management, and approvals, keeping projects moving like greased lightning.
  • Personalization for the win: Give everyone a stake in the hub. Customize dashboards, news feeds, and views to suit individual needs and preferences. No two colleagues, no two identical information experiences.

This isn’t just about organization; it’s about igniting the power of your team. By breaking down information barriers and fostering open communication, you’re creating a dynamic hub where ideas spark, knowledge flows, and collaboration soars.

Ready to roll up your sleeves and build your dream information hub? This guide will walk you through the entire process, from setting up your site to customizing features, managing access, and keeping everything sparkling clean. You’ll be a SharePoint pro in no time, guiding your department to collaborative nirvana.

Remember, a well-oiled information hub isn’t just a tech feat; it’s a cultural shift. So grab your team, dive into this guide, and watch as your department transforms from scattered islands to a collaborative powerhouse. Information at your fingertips, success within reach – let’s build something amazing together!

Step 1: Set Up Your SharePoint Site

  1. Access SharePoint:
    • Navigate to SharePoint within your Microsoft 365 account. Click on “Create Site” and choose the Team site template, providing a collaborative environment for your department.
  2. Name and Customize:
    • Give your site a meaningful name that reflects your department. Customize the site’s appearance, navigation, and permissions according to your department’s preferences and needs.

Step 2: Structure Your Content

  1. Create Document Libraries:
    • Organize your files by creating document libraries for different types of documents—whether it’s policies, procedures, or project files. This ensures a structured and easily navigable repository.
  2. Use Metadata and Tags:
    • Enhance searchability by utilizing metadata and tags. Classify documents with relevant attributes, making it easier for users to find what they need quickly.

Step 3: Foster Collaboration

  1. Add Communication Tools:
    • Integrate Microsoft Teams, discussion boards, and announcements to facilitate communication. This ensures that important updates, discussions, and announcements are readily available within the SharePoint hub.
  2. Enable Co-Authoring:
    • Leverage SharePoint’s co-authoring capabilities to allow multiple team members to collaborate on documents simultaneously. This enhances real-time collaboration on projects and reports.

Step 4: Customize Your Hub

  1. Create Custom Lists:
    • Use custom lists for tracking tasks, events, or any other department-specific information. Tailor these lists to meet the unique needs and workflows of your department.
  2. Implement Workflows:
    • Automate processes with SharePoint workflows. Whether it’s approval processes, document review, or task assignments, workflows can streamline routine tasks and enhance productivity.

Step 5: Enhance Accessibility and Security

  1. Set Permissions:
    • Define user permissions to ensure that sensitive information is accessible only to those who need it. SharePoint’s robust permission settings allow you to control access at various levels.
  2. Enable Mobile Access:
    • Make your information hub accessible on the go by enabling mobile access. SharePoint’s responsive design ensures a seamless experience across devices.

Step 6: Train Your Team

  1. Training Resources:
    • Provide training resources to your team, ensuring they are familiar with SharePoint’s features. Microsoft offers a wealth of tutorials and guides to help users navigate and utilize the platform effectively.
  2. Regular Updates:
    • Keep your team informed about updates and improvements to the SharePoint hub. Regularly communicate best practices and encourage feedback to continuously optimize the platform for your department’s needs.

Step 7: Monitor and Iterate

  1. Analytics and Usage Reports:
    • Use SharePoint’s analytics and usage reports to monitor the performance of your information hub. Analyze user engagement, popular content, and areas for improvement.
  2. Gather Feedback:
    • Actively seek feedback from your team. Regularly gather insights on the usability and effectiveness of the information hub, making adjustments based on user suggestions and evolving departmental needs.

By following the information shared in this guide, you can embark on a journey with SharePoint, elevating it into a resilient and sophisticated information hub. This dynamic evolution extends beyond merely centralizing your department’s resources; it encompasses an enhancement of collaboration, communication, and overall productivity.

One of the key facets of this transformation lies in SharePoint’s extensive customization options. Tailor the platform to your department’s unique needs, creating an environment that aligns seamlessly with your workflows and objectives. Whether it’s structuring document libraries, implementing custom lists, or automating processes with intuitive workflows, the customization capabilities empower you to mold SharePoint according to the distinctive requirements of your department.

Furthermore, the seamless integration that SharePoint offers with other Microsoft 365 applications amplifies its impact. As part of the Microsoft ecosystem, SharePoint synergizes effortlessly with tools like Teams, Outlook, and OneDrive. This interconnectedness fosters a cohesive digital workplace, where information flows seamlessly between applications, ensuring that your team operates with maximum efficiency and synergy.

Navigating through SharePoint’s user-friendly interface becomes a journey of exploration rather than a task. The intuitive design ensures that your team can effortlessly engage with the platform, promoting widespread adoption. This accessibility, coupled with features like co-authoring capabilities and mobile access, translates into a collaborative environment where information is not only centralized but is also easily accessible and actively utilized by every team member.

In essence, SharePoint emerges not just as a repository of resources but as a powerful catalyst for fostering a collaborative and well-informed departmental environment. It transforms into a dynamic space where information is not static but is constantly evolving to meet the needs of your team. As your department navigates the complexities of modern work dynamics, this transformed SharePoint stands as a beacon, enhancing the collective capabilities of your team and propelling productivity to new heights.

Safety Shouldn’t Stumble on Paperwork: A Guide to Using Microsoft Forms for Incident Reporting

Workplace safety isn’t just a slogan; it’s the beating heart of a thriving environment. And at the core of ensuring everyone goes home unharmed? Efficient incident reporting. But let’s face it, traditional channels can be clumsy and slow, turning a crucial process into a paperweight on someone’s desk. But enter the digital age, where tools like Microsoft Forms step in to revolutionize how we report safety incidents. This blog post isn’t just about singing the praises of technology; it’s about showing you how Microsoft Forms can be your secret weapon for simplifying and streamlining workplace safety reporting.

Simplicity of Microsoft Forms for Incident Reporting

  1. Creating Customized Incident Report Forms: Microsoft Forms allows you to design customized forms tailored to your specific workplace safety needs. Easily include fields such as date, time, location, and detailed descriptions of the incident. The intuitive interface makes it simple for employees to fill out reports accurately.
  2. Accessibility and Ease of Use: One of the key advantages of using Microsoft Forms is its accessibility. Employees can access the forms from any device with an internet connection. This ensures that incident reports can be submitted promptly, whether on-site or remotely. The user-friendly design of Microsoft Forms makes it easy for employees at all tech proficiency levels to navigate.
  3. Collaboration made easy: Encourage open communication and teamwork by allowing employees to add photos, videos, and witness statements to reports, providing a clearer picture of what happened.
  4. Real-time Data Collection: Microsoft Forms enables real-time data collection, providing immediate insights into workplace incidents. Supervisors and safety officers can access the submitted forms instantly, allowing for a swift response to emerging safety concerns. This feature is particularly valuable in addressing time-sensitive issues and preventing potential risks.
  5. Automated Notifications and Alerts: Streamline your incident reporting workflow by setting up automated notifications and alerts. Microsoft Forms can be configured to notify designated individuals or teams when a new incident report is submitted. This ensures that the right people are promptly informed, facilitating quicker resolution and preventive measures.
  6. Integration with Microsoft 365: Microsoft Forms seamlessly integrates with the broader Microsoft 365 ecosystem, providing a centralized platform for incident reporting. Data collected through Forms can be stored and analyzed using Excel or directly integrated into Power BI for comprehensive reporting and trend analysis. This integration ensures that incident reporting becomes an integral part of your overall safety management strategy.
  7. Secure Data Storage: Security is a top priority when dealing with sensitive incident data. Microsoft Forms offers secure data storage within the Microsoft 365 environment. This safeguards employee privacy and ensures compliance with data protection regulations.

This isn’t just about efficiency; it’s about empowering your employees to be active participants in their own safety. By making reporting accessible and straightforward, you’re building a culture of safety where everyone feels responsible and heard.

So, ditch the papercuts and embrace the digital solution. Microsoft Forms can help you turn incident reporting from a chore into a proactive tool for building a safer, happier workplace. Remember, a smooth-running safety system isn’t just good for business; it’s good for everyone.

Ready to take the plunge? Let’s explore how you can set up your own Microsoft Forms incident reporting system and start reaping the benefits of a truly digitized safety culture.

Step-by-step guide on how to configure a customized form for incident reporting:

Step 1: Access Microsoft Forms

  • Open your web browser and navigate to Microsoft Forms (forms.microsoft.com).
  • Log in with your Microsoft 365 credentials.

Step 2: Create a New Form

  • Click on the “+ New Form” button to start creating a new form.

Step 3: Design Your Incident Report Form

  • Add relevant fields for incident reporting, such as date, time, location, description, and any specific details required.
  • Utilize various question types (text, multiple-choice, etc.) to capture the necessary information accurately.
  • Do NOT be afraid to mark important questions as “required” to not allow the form to be submitted without it being answered.

Step 4: Include Conditional Logic (if needed)

  • Use branching and conditional logic to tailor the form based on the type of incident being reported. This ensures that the form adapts dynamically to different scenarios.

Step 5: Set Up Notifications

  • Click on “Settings” (gear icon) and select “Notifications.”
  • Configure email notifications to alert designated individuals or teams when a new incident report is submitted
    • These are only available for enterprise accounts

Step 6: Customize Theme and Branding

  • Personalize the form’s appearance by selecting a theme and adding your organization’s branding elements.

Step 7: Configure Form Settings

  • Adjust form settings, such as limiting responses, requiring sign-in for added security, and specifying who can respond to the form.
    • This is available for enterprise accounts only

Step 8: Preview and Test the Form

  • Preview the form to ensure it appears as intended.
  • Test the form by submitting a sample incident report to verify that notifications are triggered correctly.

Step 9: Share the Form

  • Click on the “Share” button to generate a link or embed code for the form.
  • Distribute the link to employees, ensuring easy access for incident reporting.
Want a form to start using for your Microsoft 365 incident reporting system? I have a form available to start using here

Step 10: Monitor and Analyze Responses

  • Regularly check the form’s responses tab to monitor incident reports in real-time.
  • Utilize Microsoft Forms’ integration with Microsoft 365 for detailed analysis and reporting.

Step 11: Regularly Review and Update

  • Periodically review the incident reporting form to ensure it remains relevant.
  • Update the form based on any changes in workplace safety protocols or reporting requirements.

By following these steps, you can seamlessly set up a workplace safety incident reporting system using Microsoft Forms. This streamlined process enhances data collection, notification efficiency, and overall workplace safety management.

Pros and cons of using Microsoft Forms as an incident reporting tool:

Pros:

  1. Ease of Use: Microsoft Forms has a simple and intuitive interface, making it easy for employees to quickly fill out and submit incident reports with minimal training.
  2. Real-Time Data Collection: Forms can be submitted instantly, allowing for real-time data collection and immediate notifications when an incident occurs.
  3. Customizable Templates: Microsoft Forms allows for easy customization, enabling users to design incident reporting forms tailored to their organization’s specific needs.
  4. Integration with Other Microsoft Tools: Microsoft Forms integrates seamlessly with other Microsoft 365 tools like Excel, SharePoint, and Teams, simplifying data analysis, collaboration, and reporting.
  5. Accessible on Multiple Devices: Microsoft Forms is accessible from smartphones, tablets, and computers, making it convenient for employees to report incidents from anywhere.

Cons:

  1. Limited Features for Complex Reporting: Microsoft Forms may lack advanced features for detailed incident tracking, such as categorizing or prioritizing reports, making it less suitable for complex incident management systems.
  2. Data Storage Limitations: While Microsoft Forms can store responses, large organizations with high reporting volumes may run into limitations with storage and data organization.
  3. Basic Workflow Automation: Microsoft Forms has limited options for workflow automation, which may hinder the follow-up process for incident resolution without additional integration with other tools like Power Automate.
  4. No Offline Access: Employees must have an internet connection to submit a form, which can be a challenge in remote or disconnected locations.
  5. Limited Reporting Capabilities: Although data can be exported to Excel, Microsoft Forms does not offer robust built-in analytics or reporting features, requiring additional work to analyze the data effectively.

Hierarchy of Control: Chemical Safety

Managing hazardous substances in the workplace requires a systematic approach to ensure the safety and health of all employees. With the right control strategies in place, it is possible to prevent harmful chemical exposures and create a safer work environment. One of the most effective frameworks for managing such risks is the “Hierarchy of Controls” (HOC), a method strongly recommended by the ANSI/ASSP Z10-2012 standard on Occupational Health and Safety Management Systems.

The HOC is designed to help organizations eliminate or significantly reduce exposure to hazardous chemicals by prioritizing control measures based on their effectiveness. This structured approach guides safety professionals in selecting the most appropriate interventions to mitigate risks associated with hazardous substances. When a workplace assessment identifies exposure to dangerous levels of chemicals, it is crucial to apply the following HOC strategies, in order of their effectiveness:

Primary Strategies: Addressing the Hazard Itself

  1. Elimination: The most effective solution is to completely eliminate hazardous substances from the workplace. This method ensures that the risk is entirely removed, making the work environment significantly safer. For instance, if a particular solvent poses health risks, replacing it with a non-hazardous alternative eliminates the risk altogether.
  2. Substitution: If elimination is not feasible, the next-best solution is substitution. This involves replacing a toxic substance with a less-toxic alternative. For example, using a less harmful cleaning agent instead of a highly toxic one can significantly reduce health risks. The key is to choose substitutes that maintain the same functional properties without the associated dangers.
  3. Engineering Controls: When elimination or substitution isn’t possible, engineering controls are the next line of defense. This involves redesigning or modifying processes to eliminate or reduce exposure to the chemical hazard. Examples include installing proper ventilation systems to remove harmful fumes or enclosing processes to prevent the escape of dangerous substances. These controls tackle the hazard at its source and are highly effective in creating a safer workplace.
Learn more about the Hierarchy of Control

Secondary Strategies: Modifying Behaviors to Reduce Exposure

  1. Warnings: Once the hazard itself has been addressed, the focus shifts to reducing exposure through behavioral strategies. Using container labels and signs is a crucial step. These warnings inform employees about the dangers associated with the chemicals they are handling, ensuring that they are aware of the risks and can take necessary precautions. Clear, visible warnings are essential for maintaining safety awareness among workers.
  2. Administrative Controls: Developing and incorporating safer behaviors and work practices is another vital strategy. This involves creating written safety policies and rules, providing supervision, and conducting regular training sessions. Administrative controls aim to instill a culture of safety within the workplace. However, their effectiveness depends on consistent monitoring and enforcement by supervisors. Regular safety drills and updates to safety protocols are examples of how administrative controls can be implemented effectively.
  3. Personal Protective Equipment (PPE): The use of PPE is a common and mandatory strategy when working with hazardous chemicals. PPE includes items such as gloves, goggles, and respirators, which form a barrier between workers and hazards. While PPE is essential, it should be considered a last resort, as it relies heavily on correct and consistent usage by employees. Ensuring that workers are properly trained in using PPE and regularly inspecting the equipment for wear and tear are crucial for this strategy to be effective.
Want to learn more about PPE?

By following the Hierarchy of Controls in this order, organizations can systematically address the risks associated with hazardous substances, ensuring that the most effective measures are implemented first. This proactive approach not only enhances workplace safety but also aligns with best practices for occupational health and safety management as outlined by ANSI/ASSP Z10-2012.

Key Considerations with the Hierarchy of Control

When implementing these strategies, always start by asking, “How can I eliminate, reduce, or engineer out the hazard?” This approach ensures that the most effective measures are taken first. The goal is to eliminate or reduce the hazard to the point where reliance on behavioral controls and PPE is minimized. By prioritizing elimination, substitution, and engineering controls, workplaces can achieve a higher level of safety, making behavioral strategies and PPE supplementary rather than primary measures.

In summary, the safe use of hazardous substances in the workplace hinges on a systematic approach that prioritizes the elimination and reduction of risks through a well-structured hierarchy of controls. By following these guidelines, employers can create a safer work environment, protect their employees’ health, and comply with occupational safety standards.

EPA SPCC Tier 1 Plan Template

According to Section 112.1 of 40 CFR, the requirement for a Spill Prevention, Control and Countermeasure Plan (SPCC), applies to petroleum storage facilities that:

  • Are non-transportation related.
  • Have an aggregate above ground storage capacity greater than 1,320 gallons (including all tanks, containers, and operating equipment 55 gallons or greater in capacity) or a completely buried storage capacity greater than 42,000 gallons.
  • Have a geographic location where there is a reasonable expectation of a discharge into or upon navigable waters of the US or adjoining shorelines.

Definition of Oil

Facilities that meet these three conditions must include bulk storage containers used to store oil in their SPCC Plan, if these containers have a capacity of 55 gallons or more. Oil is defined as:

  • Petroleum products, including gasoline, diesel, and engine oil
  • Animal fats
  • Vegetable oils

In general, a plan is required for any non-transportation related onshore and off- shore facility that is engaged in drilling, producing, storing, gathering, processing, transferring, distributing, using, or consuming oil products.

EPA 40 CFR 112.7 requires that a containment system for oil, including walls and floor, must be capable of containing it and must be constructed so any discharge from a primary containment system, such as a tank or pipe, can not escape before cleanup is done.
At a minimum, one of the following systems or its equivalent must be used:

On-shore facilities

  • Dikes, berms or retaining walls, which are impervious enough to contain oil
  • Curbing
  • Culverting, gutters, or another type of drainage system
  • Weirs, booms, or other barriers
  • Spill diversion ponds
  • Retention ponds
  • Sorbent materials

Off-shore facilities

  • Curbing or drip pans
  • Sumps and collection systems

If the installation of any of this equipment or structures is not practicable, the facility must clearly explain this in the Spill Prevention, Control, and Countermeasure Plan.

Check Out: Spill Response training

When Can a Container Be Excluded From Your SPCC Plan?

A bulk storage container used to store oil that has a capacity of 55 gallons or greater may not require inclusion in the installation’s SPCC Plan only under the following conditions:

  • The container is part of a separate facility that must have a separate SPCC Plan.
  • The container is part of a separate facility that does not have to prepare an SPCC Plan (a facility that does not meet the required criteria).

Requirements for a Diagram

There are many specific requirements outlined in 40 CFR 112 regarding your facility’s Spill Prevention, Control, and Countermeasure Plan. According to §112.7 (a)(3),
a facility diagram must be included and clearly outline:

  • Location of oil containers.
  • Type of oil in each container.
  • Location of any completely buried storage tanks that are otherwise exempted from SPCC regulations.
  • Location of transfer stations and piping.
  • Locations where mobile or portable containers are stored.

The SPCC Plan must include the storage capacity of each container but this does not have to be on the diagram.

Drawings and Photographs in the SPCC Plan
Site specific diagrams are not required if the facility diagram is explicit and complete. It must include:

  • The direction of oil flow.
  • The rate of flow.
  • The total quantity of oil that could be discharged as a result of each type of major equipment failure. This may include loading/unloading equipment, tank rupture, overflow or leakage.

If site specific drawings or detailed facility drawings are included, illustrate:

  • The predicted discharge direction on the drawing.
  • Discuss the rate of flow and quantity of oil that could be discharged as a result of the different types of equipment failure.

Photographs are not required but they could assist in rapid recognition of the site layout. They can illustrate a visual history of the physical condition of the facility and/or the containers located there.

Download and view the EPA SPCC Tier 1 Plan Template below:

SPCC EPA Tier 1 Plan Template

OSHA Employee Rights

On December 29, 1970, President Nixon signed the OSH Act. This Act created OSHA, the agency, which formally came into being on April 28, 1971. With the creation of OSHA, for the first time, all employers in the United States had the legal responsibility to provide a safe and healthful workplace for employees. And, there were now uniform regulations that applied to all workplaces.

The mission of OSHA is to assure safe and healthful working conditions for working men and women by setting and enforcing standards and by providing training, outreach, education and assistance.

Some of the things OSHA does to carry out its mission are:

  • developing job safety and health standards and enforcing them through worksite inspections
  • providing training programs and educational materials to increase knowledge about occupational safety and health
  • providing on-site safety and health consultation services for small business
  • promoting the Safety and Health Achievement Program (SHARP) to recognized exemplary employers
  • offering cooperative programs under which employers work cooperatively with OSHA
  • partnering with employers under the OSHA Strategic Partnerships and Alliances (OSP) program
  • recognizing employers who have demonstrated excellence under the Voluntary Protection Program (VPP)

What Rights Do You Have Under OSHA?

osha3165-8514


This poster is FREE from OSHA, many languages available, go here

With OSHA you have the right to:

  • safe and healthful workplace
  • be free from retaliation for exercising safety and health rights
  • raise a safety or health concern with your employer or OSHA, or report a work-related injury or illness, without being retaliated against
  • receive information and training on job hazards, including all hazardous substances in your workplace
  • request an OSHA inspection of your workplace if you believe there are unsafe or unhealthy conditions
  • refuse to do a task if you believe it is unsafe or unhealthful
  • participate (or have your representative participate) in an OSHA inspection and speak in private to the inspector
  • file a complaint with OSHA within 30 days (by phone, online or by mail) if you have been retaliated against for using your rights
  • see any OSHA citations issued to your employer
  • request copies of your medical records, tests that measure hazards in the workplace, and the workplace injury and illness log

Employer Responsibilities Under OSHA

  • Provide employees a workplace free from recognized hazards. It is illegal to retaliate against an employee for using any of their rights under the law, including raising a health and safety concern with you or with OSHA, or reporting a work-related injury or illness.
  • Comply with all applicable OSHA standards.
  • Report to OSHA all work-related fatalities within 8 hours, and all inpatient hospitalizations, amputations and losses of an eye within 24 hours.
  • Provide required training to all workers in a language and vocabulary they can understand.
  • Prominently display this poster in the workplace.
  • Post OSHA citations at or near the place of the alleged violations.
Learn more about Employer Responsibilities Under OSHA

Your Right to a Safe and Healthful Workplace

OSHA was created to provide workers the right to a safe and healthful workplace. Let’s look at what the Occupational Safety and Health Act of 1970 (OSH Act) says about employer and employee duties.

OSH Act of 1970 Section 5(a) Duties.

(a) Each employer —

  • (1) shall furnish to each of his employees employment and a place of employment which are free from recognized hazards that are causing or are likely to cause death or serious physical harm to his employees;
  • (2) shall comply with occupational safety and health standards promulgated under this Act.

(b) Each employee shall comply with occupational safety and health standards and all rules, regulations, and orders issued pursuant to this Act which are applicable to his own actions and conduct.

Employer obligations. Section 5(a) says employers must:

  • furnish safe employment (work, jobs) and a safe place of employment (the workplace, worksite);
  • provide workplaces that are free of hazards that are known or should have been known by the employer;
  • provide workplaces that are free of hazards that could cause death or serious physical harm to employees; and
  • comply with occupational safety and health standards promulgated under this Act.

Employee obligations. The section says employees must:

  • comply with OSHA standards, and
  • comply with employer rules, regulations, and orders which are applicable to his own actions and conduct.

Right to Raise Safety Concerns

You may bring up safety and health concerns in the workplace to your employer without fear of discharge or discrimination, as long as the complaint is made in good faith. Check out the video: an Oregon OSHA compliance officer just happened to be on a construction site. Would you, as an employee raise the same concerns as that raised by the Oregon OSHA inspector. If you have concerns, make sure you tell your safety committee, supervisor, or safety manager.

OSHA regulations protect workers who raise concerns to their employer or to OSHA about unsafe or unhealthful conditions in the workplace. You cannot be transferred, denied a raise, have your hours reduced, be fired, or punished in any other way because you have exercised any right afforded to you under the OSH Act.

If you become aware of a hazard where you’re working, be sure to notify your immediate supervisor. If you are not comfortable doing that for some reason, contact the safety manager or a member your safety committee.


Right to Refuse Dangerous Work

You may file a complaint with OSHA concerning a hazardous working condition at any time. However, you should not leave the worksite merely because you have filed a complaint.

If the condition clearly presents a risk of death or serious physical harm, there is not sufficient time for OSHA to inspect, and, where possible, you have brought the condition to the attention of your employer, you may have a legal right to refuse to work in a situation in which you would be exposed to the hazard. OSHA cannot enforce union contracts that give employees the right to refuse to work.

Your right to refuse to do a task is protected if ALL of the following four conditions are met:

  1. Where possible, you have asked the employer to eliminate the danger, and the employer failed to do so; and
  2. You refused to work in “good faith.” This means that you must genuinely believe that an imminent danger exists; and
  3. A reasonable person would agree that there is a real danger of death or serious injury; and
  4. There isn’t enough time, due to the urgency of the hazard, to get it corrected through regular enforcement channels, such as requesting an OSHA inspection.

If the above conditions are met, you should take the following steps:

  • Ask your employer to correct the hazard, or to assign other work;
  • Tell your employer that you won’t perform the work unless and until the hazard is corrected; and
  • Remain at the worksite until ordered to leave by your employer.

Right to Training

Conduct classroom and “hands-on” training.

You have a right to get training from your employer on a variety of health and safety hazards and standards that your employer must follow.

We’ve already discussed the training required under OSHA’s Hazard Communication (Right to Know) standard. Other required training includes chemical hazards, equipment hazards, noise, confined spaces, fall hazards in construction, personal protective equipment, and a variety of other subjects.

The training must be in a language and vocabulary workers can understand.

It is a good idea to keep a record of all safety and health training. Documentation demonstrates employer due diligence and can also supply an answer to one of the first questions OSHA will ask if they conduct an inspection or accident investigation: “Did the employee receive adequate training to do the job?” Remember, as far as OSHA is concerned, if it isn’t in writing, it didn’t get done.

For more information on on OSHA’s training requirements download Publication 2254

Your Right to File a Complaint

You, and your representative, have a right to file a confidential complaint with OSHA if you believe a violation of a safety or health standard that threatens physical harm, or an imminent danger situation, exists in the workplace. Important points to remember include:

  • The complaint will be formalized in writing, and signed by you or your representative.
  • You must set forth reasonable and specific grounds for the notice of complaint.
  • You may request that your name, or that of your representative not be revealed to the employer.
  • OSHA will notify the employer about the complaint, and conduct a special inspection if there are reasonable grounds to believe a violation or danger exists.
  • You have the right to find out OSHA’s action on the complaint and request a review if an inspection is not made.

You can file a complaint online at OSHA’s website, in writing or by telephone to the nearest OSHA area office. You may also call the office and speak with an OSHA compliance officer about a hazard, violation, or the process for filing a complaint.


Right to Participate in OSHA Inspections

During an OSHA inspection, you or your representative has the following rights:

  • Have a representative of employees, such as the safety steward of a labor organization, go along on the inspection;
  • Talk privately with the inspector; and
  • Take part in meetings with the inspector before and after the inspection.

When there is no authorized employee representative, the OSHA inspector must talk confidentially with a reasonable number of workers during the inspection.

Workers are encouraged to:

  • Point out hazards;
  • Describe injuries illnesses or near misses that resulted from these hazards and describe any concerns about a safety or health issue;
  • Discuss past worker complaints about hazards; and
  • Inform the inspector of working conditions that are not normal during the inspection.
  • Find out about inspection results, abatement measures and may object to dates set for violation to be corrected

Right to be Free From Retaliation

Workers have the right to be free from retaliation for exercising safety and health rights called “protected activities.”

  • Workers have a right to seek safety and health on the job without fear of punishment.
  • This right is spelled out in Section 11(c) of the OSH Act.
  • Workers have 30 days to contact OSHA if they feel they have been punished for exercising their safety and health rights.

Protected activities: You may file a complaint with OSHA if your employer retaliates against you by taking unfavorable personnel action because you engaged in protected activity relating to workplace safety or health. Examples of protected activities include complaints about the following:

  • workplace safety and health
  • asbestos in schools
  • cargo containers
  • airlines and commercial motor carrier
  • consumer products food safety and environmental issues
  • financial reform and health insurance reform, and securities laws
  • motor vehicle safety and public transportation
  • nuclear, pipeline, railroad, and maritime safety

Examples of retaliatory actions by your employer may include:

  • applying or issuing a policy which provides for an unfavorable personnel action due to activity protected by a whistleblower law enforced by OSHA
  • blacklisting
  • demoting
  • denying overtime or promotion
  • disciplining
  • denying benefits
  • failing to hire or rehire
  • firing or laying off
  • intimidation
  • making threats
  • reassignment to a less desirable position, including one adversely affecting prospects for promotion
  • reducing pay or hours
  • suspension

How OSHA Determines Whether Retaliation Took Place

The investigation must reveal that:

  • The employee engaged in protected activity;
  • The employer knew about or suspected the protected activity;
  • The employer took an adverse action; and
  • The protected activity motivated or contributed to the adverse action.
Check out OSHA’s Whistleblower Factsheet

If the evidence supports the employee’s allegation and a settlement cannot be reached, OSHA will generally issue an order, which the employer may contest, requiring the employer to reinstate the employee, pay back wages, restore benefits, and other possible remedies to make the employee whole.

be aware that the loss of Chevron deference can impact your rights as an employee as well, to learn more, check out my post about OSHA and the loss of Chevron Deference.

PIT and the loss of Chevron Deference

Here is the next in my series where I examine the effect the loss of Chevron deference could have on OSHA standards and workplace safety, this week we are reviewing OSHA 1910.178 Powered Industrial Trucks.

If you missed any of my previous articles, here they are:

The Occupational Safety and Health Administration (OSHA) standard 1910.178 serves as a critical foundation for ensuring the safe operation of powered industrial trucks (PITs), commonly known as forklifts. While the standard offers a comprehensive framework with specific regulations, it also contains areas of ambiguity that necessitate further interpretation.

This inherent tension between specificity and ambiguity can be challenging. On the one hand, detailed regulations provide clear guidelines for employers and employees alike, minimizing confusion and promoting consistent safety practices. However, overly prescriptive rules might not account for the diverse situations encountered in real-world workplaces.

OSHA addresses these ambiguities through “letters of interpretation.” These non-mandatory documents offer OSHA’s official clarification on specific points within the standard. While they hold significant weight, they are not legally binding, and with the loss of Chevron Deference the OSHA letters of interpretation aren’t even given the weight of being expert

Here are some of the main ambiguities and the specific clarifications provided:

Ambiguities of OSHA Powered Industrial Truck Standard

  • Definition of a Powered Industrial Truck
    • The scope of what constitutes a powered industrial truck (PIT) can be particularly unclear, especially given the continuous evolution of technologies and the introduction of various types of machinery. Traditionally, PITs include vehicles like forklifts, pallet jacks, and order pickers, which are powered by electric motors or internal combustion engines. However, as technology advances, new equipment emerges that does not fit neatly into these conventional categories, creating ambiguity about what machinery falls under the OSHA 1910.178 standard.
    • For instance, the development of automated guided vehicles (AGVs) and autonomous mobile robots (AMRs) used in warehouses and manufacturing settings presents a challenge. These machines often perform similar functions to traditional PITs but operate using advanced robotics and automation technologies. Determining whether these newer types of equipment are subject to the same regulations as traditional PITs can be complex and unclear.
    • Moreover, hybrid machinery that combines features of PITs with other types of industrial equipment adds another layer of complexity. These hybrid machines might include elements of forklifts along with other functionalities, leading to confusion about their classification and the specific safety standards that should apply.
  • Operator Training and Certification
      • The specifics of what constitutes adequate training for powered industrial truck operators, who qualifies as a trainer, and how often retraining should occur can be quite ambiguous. This ambiguity poses significant challenges for employers striving to comply with OSHA standards and ensure the safety of their employees.
      • Firstly, “adequate training” involves formal instruction, practical training, and performance evaluation, but the exact content and depth are not clearly defined. Employers may struggle with determining necessary topics, training duration, and the balance between theory and practice, leading to inconsistent training quality.
      • Secondly, identifying who qualifies as a trainer is another area of uncertainty. OSHA requires trainers to have the “knowledge, training, and experience” to train and evaluate operators, but these qualifications are not explicitly detailed, causing confusion about the necessary credentials, certifications, or experience levels.
      • Thirdly, the frequency of retraining is ambiguous. While OSHA mandates retraining under certain conditions, such as unsafe operation or accidents, it does not specify a regular interval, leading to either neglecting necessary retraining or conducting it too frequently.
Check Out: Important Components of a Powered Equipment Program
  • Maintenance and Inspection
    • The requirements for the frequency and extent of inspections and maintenance routines are not always explicitly clear. While OSHA mandates that powered industrial trucks (PITs) must be regularly inspected to ensure their safety and proper functioning, the standard does not provide specific guidelines on how often these inspections should occur or the detailed processes involved in maintaining the equipment. This lack of explicit detail can lead to uncertainty among employers about how frequently they need to perform inspections and what constitutes a thorough maintenance routine.
    • Employers may find it challenging to determine the appropriate intervals for inspections, whether daily, weekly, or monthly, based on the usage and condition of the equipment. Additionally, the standard does not always specify what aspects of the PIT should be included in these inspections or how comprehensive the maintenance procedures should be. This ambiguity can result in variations in how different organizations approach equipment maintenance, potentially impacting overall safety and compliance.
  • Modifications and Attachments
    • The standard does not always specify which types of modifications or attachments are permissible without impacting the safe operation of powered industrial trucks (PITs). While OSHA regulations provide general guidelines for the safe operation of PITs, they lack detailed criteria on what modifications or attachments can be added without compromising safety. This ambiguity can create uncertainty for employers about which alterations are acceptable and which may pose risks.
    • For example, modifications such as changing the truck’s load capacity or adding new attachments like extended forks or platforms can potentially affect the stability and operational characteristics of the PIT. However, the standard does not always provide clear guidance on how to evaluate these modifications or ensure they do not negatively impact the truck’s safety features.
    • Employers may struggle to determine whether modifications require manufacturer approval or if additional safety measures are necessary to accommodate new attachments. This uncertainty can lead to inconsistent practices and potential safety hazards if modifications are not properly evaluated and implemented.

Clarifications for PIT from OSHA Letters of Interpretation

  1. Definition of a Powered Industrial Truck
    • OSHA has clarified that PITs include forklifts, pallet jacks, order pickers, and other specialized industrial trucks powered by electric motors or internal combustion engines. This definition helps employers understand the range of equipment covered by the standard.
  2. Operator Training and Certification
    • OSHA requires that training be site-specific and include both formal instruction and practical training. Trainers must have the necessary knowledge, training, and experience to train operators and evaluate their competence. Refresher training is required when there is a demonstrated need, such as after an incident or when new equipment is introduced.
  3. Maintenance and Inspection
    • OSHA’s letters of interpretation specify that PITs must be inspected daily or at the beginning of each shift if they are used continuously. Maintenance records should be kept, and any identified issues must be addressed before the PIT is used again.
  4. Modifications and Attachments
    • OSHA has clarified that modifications and additions that affect the capacity and safe operation of the PIT must not be performed without the manufacturer’s prior written approval. This includes the use of attachments such as forks, platforms, or other add-ons that could impact stability and handling.

Examples of Clarifications from Letters of Interpretation

  1. Training Clarification
    • A letter clarified that retraining is required if the operator is observed driving in an unsafe manner, involved in an accident or near-miss, or assigned to drive a different type of truck. Additionally, changes in the workplace that affect safe operation necessitate retraining.
  2. Inspection and Maintenance Clarification
    • Clarification was provided that daily checks should include tire condition, fluid levels, the functioning of brakes and steering, and the condition of the forks. Documentation of these checks, while not explicitly required, is highly recommended.
  3. Attachments Clarification
    • OSHA specified that any attachment used must be included in the training program, and operators must understand how the attachment affects the truck’s operation and handling characteristics.

By addressing these ambiguities through letters of interpretation, OSHA provides crucial clarity and guidance on the requirements for powered industrial trucks (PITs). These interpretations help bridge gaps in the standard, offering detailed explanations and specific examples that assist employers and employees in understanding their responsibilities and compliance obligations.

This enhanced clarity helps organizations navigate complex aspects of PIT regulations, such as permissible modifications, inspection frequency, and proper maintenance routines. By offering concrete guidance, OSHA’s letters of interpretation facilitate safer and more consistent practices across various industries.

Employers can more effectively implement safety measures, ensure proper equipment use, and adhere to maintenance protocols, while employees benefit from a clearer understanding of safe operation procedures. Overall, these clarifications promote a more reliable and uniform application of safety standards, contributing to a safer working environment and reducing the risk of accidents and compliance issues related to PITs.

LoTo and the Loss of Chevron Deference

Here is the next in my series where I examine the effect the loss of Chevron deference could have on OSHA standards and workplace safety, this week we are reviewing Lockout/Tagout.

If you missed any of my previous articles, here they are:

The whole series is centered around understanding what it means to workplace safety to lose Chevron deference, and the risk to workers from workplaces that don’t care about employees.

OSHA standard 1910.147, known as the Control of Hazardous Energy (Lockout/Tagout) standard, outlines measures for controlling hazardous energy during the servicing and maintenance of machines and equipment. Despite its importance in preventing workplace injuries, certain aspects of this standard can be ambiguous, necessitating clarifications through OSHA letters of interpretation.

Ambiguities in OSHA 1910.147 – Lockout/Tagout

  • Scope of the Standard:
    • Ambiguity often arises regarding which specific activities and types of equipment are covered by the standard. While OSHA 1910.147 clearly applies to servicing and maintenance operations, the line between what constitutes normal production operations and what activities require lockout/tagout procedures can be less well-defined. This distinction can create confusion for employers trying to determine when and how to apply the lockout/tagout requirements. For example, routine adjustments or minor repairs performed during regular production might not seem to fit the criteria for lockout/tagout, yet these tasks could still pose significant risks if proper energy control measures are not implemented. Similarly, the standard’s application to various types of equipment and machinery—especially those involving complex or new technologies—may not always be immediately apparent. This uncertainty can lead to inconsistent application of safety practices, potentially compromising worker safety and increasing the risk of accidents. Clearer guidance is needed to help employers accurately identify which operations necessitate lockout/tagout procedures and ensure that all potentially hazardous situations are appropriately addressed.
  • Definition of “Authorized Employee”:
    • The term “authorized employee” in OSHA 1910.147 refers to individuals who are responsible for applying lockout or tagout devices to machines during servicing and maintenance activities. However, there can be significant confusion surrounding the specific qualifications and training necessary for an employee to be deemed “authorized.” The standard outlines that an authorized employee must be trained in the recognition of hazardous energy sources, the methods and means for energy isolation, and the importance of preventing accidental energy release. Yet, the exact criteria for what constitutes sufficient training and qualifications can be vague. Employers may find it challenging to determine the depth and scope of training required to meet these standards, leading to inconsistent practices and potential gaps in safety. This ambiguity can result in some employees being inadequately prepared to handle energy control procedures, which could undermine the effectiveness of the lockout/tagout program and increase the risk of workplace accidents. Clearer definitions and more detailed guidance on the training and qualifications for authorized employees would help ensure that all individuals responsible for energy control are adequately prepared and capable of performing their duties safely.
  • Group Lockout/Tagout Procedures:
    • The standard acknowledges the use of group lockout/tagout procedures but offers limited guidance on how to implement these procedures effectively, which can result in a range of interpretations and practices. While the concept of group lockout/tagout is intended to address situations where multiple employees are involved in servicing or maintaining equipment, the lack of detailed instructions leaves room for ambiguity. This limited guidance means that employers may interpret the requirements differently, leading to inconsistent application of safety measures across different workplaces.
    • For example, the standard does not specify the precise methods for coordinating lockout/tagout among multiple workers, nor does it provide clear criteria for ensuring that all individuals involved in a group lockout/tagout procedure are adequately protected. Consequently, practices can vary widely, with some organizations implementing robust group procedures while others may apply less comprehensive measures. This inconsistency can lead to safety gaps, where the intended protection for all workers is not uniformly achieved. To ensure effective implementation and uniformity in safety practices, more detailed guidance and examples are needed on how to conduct group lockout/tagout procedures, ensuring that all team members are effectively safeguarded during maintenance and servicing activities.
  • Periodic Inspections:
    • OSHA mandates that periodic inspections of energy control procedures be conducted to ensure ongoing compliance with lockout/tagout requirements. However, the standard does not provide specific details regarding the frequency or detailed procedures for these inspections. This lack of precision leaves employers with a degree of uncertainty about how to fulfill their obligations effectively.
    • Employers are left to interpret the requirements and decide on their own how often these inspections should occur and what exactly they should entail. This ambiguity can result in varied practices across different workplaces, with some employers possibly conducting inspections too infrequently or inadequately, which could lead to lapses in safety. The absence of clear guidelines means that employers must make judgment calls on the appropriate frequency and thoroughness of inspections, which can impact their ability to maintain consistent and effective energy control procedures. To address these challenges and enhance compliance, more explicit guidance from OSHA on the frequency and scope of periodic inspections would be beneficial, ensuring that all employers can consistently meet safety standards and effectively protect their workers.
  • Energy Isolation Devices:
    • The standard uses the term “energy isolation device” to refer to equipment designed to isolate hazardous energy sources and prevent accidental energy release. However, the criteria for determining what qualifies as an adequate energy isolation device can be ambiguous, especially in the context of new and emerging technologies.
    • The standard does not provide a comprehensive list or detailed specifications for what constitutes an acceptable energy isolation device, leading to potential confusion among employers. This lack of clarity can make it challenging for organizations to select devices that meet the necessary safety standards, particularly when dealing with innovative or complex machinery that may not have been explicitly addressed by existing guidelines.
    • As technology advances, new types of energy isolation devices are continually developed, and their suitability for compliance with OSHA’s standards may not be immediately clear. This evolving landscape further complicates the process of ensuring that all energy isolation devices used in the workplace are both effective and compliant with regulatory requirements. To address these challenges, more precise criteria and updated guidance on what constitutes an adequate energy isolation device are needed, helping employers make informed decisions and maintain robust safety practices in the face of technological advancements.

Clarifications from OSHA Letters of Interpretation

OSHA has issued numerous letters of interpretation to address these ambiguities and provide clearer guidance to employers and employees. Here are some key clarifications:

  • Scope of the Standard:
    • OSHA has provided clarification that activities such as minor tool changes and adjustments, which are routine, repetitive, and integral to the use of equipment for production, do not fall under the requirements of the lockout/tagout standard, provided they are performed using alternative measures that offer effective protection. These routine activities are considered part of normal operations and, therefore, exempt from lockout/tagout requirements as long as the alternative measures in place are sufficient to protect workers from hazardous energy.
  • Authorized Employee:
    • OSHA has issued detailed clarifications on the training requirements for authorized employees responsible for lockout/tagout procedures. Authorized employees must receive comprehensive, job-specific training covering the energy control procedures they will use. This training must include recognizing hazardous energy sources such as electrical, mechanical, hydraulic, pneumatic, chemical, and thermal. Employees need to understand the specific hazards associated with each type of energy source.
    • Additionally, the training must cover methods and means for effective energy isolation and control. This includes detailed instruction on shutting down equipment, isolating energy sources, and applying lockout or tagout devices to prevent hazardous energy release. Employees must also know how to test and verify effective energy isolation before commencing maintenance or servicing work.
    • Since the standard is this brief: 1910.147(c)(7)(i)(A)-Each authorized employee shall receive training in the recognition of applicable hazardous energy sources, the type and magnitude of the energy available in the workplace, and the methods and means necessary for energy isolation and control.
  • Group Lockout/Tagout Procedures:
    • OSHA has provided detailed clarification for group lockout/tagout procedures to ensure the safety of all employees involved in servicing or maintenance activities. According to these guidelines, each authorized employee must apply a personal lockout or tagout device to a group lockout mechanism. This requirement ensures that each worker maintains individual control over the energy isolation, thereby enhancing personal accountability and safety.
  • Periodic Inspections:
    • OSHA has specified that periodic inspections must be conducted at least annually to ensure that the energy control procedures are being properly followed. The inspection must include a review of each authorized employee’s responsibilities under the energy control procedure.
  • Energy Isolation Devices:
    • OSHA has provided examples of acceptable energy isolation devices, such as manually operated circuit breakers, disconnect switches, and line valves. These devices must be capable of isolating the energy source and preventing the release of hazardous energy.


OSHA’s letters of interpretation are essential in addressing these ambiguities. These letters provide detailed explanations and practical examples that clarify the intent and application of the standard. For instance, they can specify what constitutes an adequate energy isolation device, what training is necessary for an employee to be considered authorized, and how to implement group lockout/tagout procedures correctly. By offering this guidance, OSHA helps employers and employees navigate the complexities of the standard, ensuring they understand how to meet the requirements.

Through these clarifications, OSHA enables workplaces to implement lockout/tagout procedures more effectively, thereby enhancing safety and compliance. Clear and specific guidance helps to eliminate uncertainties, allowing for consistent and proper application of safety measures across different industries and situations. As a result, employees are better protected from hazardous energy during servicing and maintenance activities, which reduces the risk of accidents and injuries.

In summary, OSHA 1910.147’s ambiguities regarding its scope, definitions, procedures, and requirements necessitate detailed clarification through OSHA’s letters of interpretation. These interpretations play a vital role in helping employers and employees understand and correctly apply the standard, ultimately promoting safer work environments and ensuring regulatory compliance.

Every Organization Needs a Safety Plan

If you have never had a serious accident in your company headquarters or meeting place, count yourself lucky. In the United States, we live in a litigious society, and if someone is injured while away from home, that injured person may very well file a lawsuit against the company owning or running a building or piece of equipment. Even meeting or event organizers can be at risk. Insurance companies and courts look kindlier on organizations that have a written safety plan. Having a plan in place shows you have considered potential safety hazards, and are doing your best to follow all regulations, educate all participants, and thus prevent an accident.

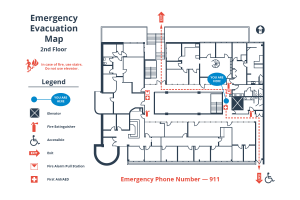
If you do not have a plan, or if you have one that is poorly written or if nobody in your organization knows a plan exists, you are at greater risk of lawsuit or victims being awarded larger settlements in court. In many situations, such as on building sites, safety plans are mandated by the authorities. In any case, having a written safety plan is always a good idea and knowing the laws that pertain to your work location are a must.

The goals of a safety plan are basically two-fold: to explain the responsibilities of management and employees (including all legal regulations that must be obeyed); and to describe all safety rules that pertain to the site, the activity, and the audience in question.

So, what should go into a safety plan? First, check federal and local statutes to determine what your legal responsibilities are.

Next, consider the site where you are meeting or doing business. You should always know where to find an accurate blueprint or map in case you or the authorities need one. Then think about all the activities that take normally place on that site and all the people, vehicles, and machinery that may be present, and imagine the accidents that could happen there. Unless you work for Homeland Security or a specialty security firm, you probably do not need to plan for terrorist attacks or aircraft falling out of the sky; your due diligence is simply to address the most common emergency situations for your site. If you are leasing a space for business purposes or even for meetings or other events, be sure to check with the building owner or management to review their safety plan.

Check Out: Basics of a Written Safety Plan

Inside any building, you must always consider the possibility of fire. So, every safety plan should explain how to evacuate the building, include a map of all exits, and contain an explanation of what should happen in the case of a fire. Will an alarm sound? Will overhead sprinklers come on? Will the fire department automatically be notified by the alarm system, or do you need to specifically assign someone to call them? Are there fire doors that should be closed? The plan should include a diagram marking the location of fire extinguishers as well as instructions on how to use them (or better yet, make sure those instructions are attached to each extinguisher). If you keep different types of fire extinguishers for different types of fires, the safety plan should explain that. Does your organization keep chemicals or pressurized containers that could explode or release noxious gasses during a fire? Be sure to note those, too.

Another situation to consider in a building safety plan is electrical failure. If all the power suddenly goes out, what should people do? Will emergency lights or backup generators automatically come on, or must someone turn them on? Will phones and smoke alarms work? How about security systems? You should provide a plan of what to do in the case of a sudden blackout. You may also need to provide instructions about procedures to follow when the power comes back on. Will machinery and computers require a startup procedure or need to be reset in some way? Do you have mission critical equipment that must not fail in a power outage such as medical devices?

Are you situated in an earthquake zone? If yes, you need to account for that possibility, instructing people to move outside or get under desks and tables if they can’t safely get to doorways. Often earthquakes will cause electrical failures or water and gas leaks, so you need to include instructions on what to do about all those problems, too.

Check Out: Is Your Company Prepared for an Emergency?

Your type of business or activity will determine other potential dangers that you need to address in a safety plan. Do your personnel work with hazardous chemicals? You need to identify each chemical, state the possible hazards and spell out the appropriate precautions for working with it. (The use of hazardous chemicals generally requires posting SDS sheets that contain all this information.)

Do your employees or volunteers operate potentially dangerous equipment? Your plan should discuss how to turn each piece of equipment on and off and describe any procedures and warnings needed to work safely with it. These two issues are especially important on any construction site, even if it’s only a small remodel job. Other important issues to address in a safety plan are hazards associated with earthmoving, such as ditch cave-ins or accidentally cutting electrical, gas, or water lines. The way that materials are stored can be hazardous, too – each year workers suffer crush injuries or die after being buried under hundreds of pounds of plasterboard or lumber that slid from a stack.

Is vehicle traffic a safety consideration? For those working on construction sites, it certainly can be. How about pedestrians? You need to consider everything you need to do to keep not only your employees safe, but also any passers-by who may wander through a hazardous area.

Construction sites may also need to deal with noise hazards and issues with dust of all kinds.

If you work in extreme climates, you may need to include instructions for preventing and dealing with hypothermia or heat exhaustion.

Security is another area nobody likes to think about, but all managers and organizers should. What should happen if an armed intruder comes into your area? Of course, someone should call the police, but are there also doors that need to be locked or checked? Are there places employees should hide? What do you want an employee to do if she discovers an unlocked door or suspects suspicious activity after normal business hours?

Everyone who is routinely present on your site also needs to know what to do in the case of medical emergency. If you have defibrillators available, make sure everyone knows where they are and how to use them. Do you have first aid kits on hand? Be sure your plan specifies their locations, too.

All staff should know the numbers to call in the case of emergency, as well as what to say. Keep in mind that people often cannot think clearly during an emergency. Make sure the emergency number (even if it’s always 9-1-1) and address of your building or site is posted where it can easily be seen (having a quick reference card in every room can help). If there are supervisors or insurance personnel who must be notified, be sure to list their contact information, too.

Creating a safety plan might sound daunting, but you will find all sorts of safety information available on the internet and more in the hands of authorities; you can plug all the appropriate information into your own plan and customize it to fit your situation.

After you’ve created your plan, don’t just file it away in a cabinet. Your employees (or members or volunteers) need to learn about what’s in the plan. You may need to hold periodic training sessions, so everyone concerned can learn how to work safely together. Safety is everyone’s responsibility.

View and Download the Expanded Employee Safety Manual below:


Expanded Employee Safety Manual – Example


Machine Guarding and the loss of Chevron Deference

Here is the next in my series where I examine the effect the loss of Chevron deference could have on OSHA standards and workplace safety, this week we are reviewing Machine Guarding.

If you missed it, here is my article on PPE and the loss of Chevron Deference. The whole series is centered around understanding what it means to workplace safety to lose Chevron deference, and the risk to workers from workplaces that don’t care about employees.


OSHA standard 1910.212 pertains to general requirements for all machines, specifically machine guarding. This standard aims to protect employees from hazards such as those created by point of operation, ingoing nip points, rotating parts, flying chips, and sparks. However, certain aspects of this standard are ambiguous and have required clarifications through OSHA letters of interpretation. Here are some of the common areas of ambiguity and the issues that frequently require interpretation:

  • General Nature of the Requirements:
    • The standard establishes broad requirements for machine guarding but fails to provide specific details on how to implement these requirements across different machines and operational contexts. This lack of precision can create significant uncertainty for employers trying to determine what specific guarding methods are considered compliant. Without clear, detailed guidance, businesses may find it challenging to apply the general principles of the standard to their unique machinery and operational circumstances. This ambiguity can lead to varied interpretations and implementations of guarding measures, potentially resulting in inconsistent safety practices and compliance issues across different workplaces. As a result, employers may struggle to ensure that their machine guarding methods meet OSHA’s expectations, potentially putting workers at risk, and OSHA would not have a recourse to address the hazard in the workplace outside of a lengthy court proceeding.
  • Definition of “Point of Operation”:
    • The term “point of operation” denotes the specific area on a machine where work is performed on the material being processed. However, the exact boundaries and characteristics of this area are not clearly defined, which can lead to varying interpretations. This ambiguity can make it difficult for employers to determine precisely what constitutes the point of operation for different types of machinery. As a result, there may be inconsistencies in how this critical area is identified and guarded, leading to potential safety risks. Without a clear, universally accepted definition, businesses might implement differing safety measures, potentially resulting in non-compliance with OSHA standards and varying levels of protection for workers. This lack of clarity necessitates further guidance to ensure that employers can effectively and uniformly identify and guard the point of operation to maintain a safe working environment.
  • Criteria for Guard Effectiveness:
    • OSHA 1910.212 mandates that guards be “affixed to the machine where possible” and designed to prevent employees from having any part of their body in the danger zone during operation. However, the standard does not provide precise criteria for what constitutes an effective guard, leading to significant ambiguity. This vagueness can result in uncertainty for employers trying to comply with the regulation, as they must determine on their own what types of guards will sufficiently protect employees from the hazards associated with specific machines. The absence of clear, detailed guidelines means that interpretations can vary widely, potentially leading to inconsistent implementations of guarding measures across different workplaces. This lack of specificity not only complicates the task of ensuring compliance but also poses a risk to worker safety, as improperly guarded machines may fail to provide the necessary protection. Clearer criteria are needed to guide employers in selecting and installing effective machine guards, thereby enhancing workplace safety and regulatory compliance.
  • Variety of Machines and Hazards:
    • Given the wide range of machinery covered under this standard, it can be challenging to determine the appropriate type of guarding for specific machines and hazards. This diversity necessitates a more tailored approach, which the standard itself does not provide.
Check Out: Machine Guarding Basics

Clarifications from OSHA Letters of Interpretation

OSHA has issued several letters of interpretation to address these ambiguities. Here are some key points clarified through these letters:

  • Specific Guarding Requirements:
    • OSHA has provided more detailed guidance on acceptable guarding methods for different types of machinery. For example, certain letters explain how to guard specific machines like press brakes, conveyors, and woodworking machinery.
  • Point of Operation Guarding:
    • Clarifications have been made regarding what constitutes adequate point of operation guarding. OSHA has emphasized that guards must not only prevent contact with the danger zone but also be designed and installed in a way that does not create additional hazards.
  • Guard Effectiveness Criteria:
    • OSHA has outlined criteria for what makes a guard effective, such as being secure, preventing access to the danger zone, and being constructed of durable materials. The interpretation letters often provide examples of compliant guards and non-compliant ones.
  • Alternative Guarding Methods:
    • In cases where standard guarding is not feasible, OSHA letters have discussed acceptable alternative methods, such as the use of electronic safety devices, two-hand controls, and safety distance measures. These alternatives must provide equivalent protection to traditional guards.
  • Maintenance and Adjustment of Guards:
    • OSHA has clarified that guards must be maintained in good condition and adjusted appropriately to ensure continued protection. This includes regular inspections and repairs as needed.


The Supreme Court’s decision to overturn Chevron deference casts a shadow over OSHA’s ability to enforce machine guarding regulations. While the core standards will likely remain, the interpretation and enforcement process faces significant hurdles. Increased litigation, conflicting court rulings, and the potential for a legislative overhaul of machine guarding regulations are all on the horizon.

This new landscape presents challenges for both employers and employees. Employers will need to closely monitor legal developments and ensure their machine guarding practices comply with the strictest interpretations of existing regulations.

The path forward for machine guarding regulations remains uncertain. However, one thing is clear: the importance of safeguarding workers from machinery hazards hasn’t diminished. Stakeholders across the board – employers, employees, advocacy groups, and lawmakers – will need to work together to navigate this new environment and ensure the continued safety of America’s

Emergency Action Plans Explained

How would your employees escape from the workplace in an emergency?

Do they know where all the exits are in case their first choice is too crowded?

Are you sure the doors will be unlocked and the exit route, such as a hallway, will not be blocked during a fire, explosion, or other crisis?

Knowing the answers to these questions could keep your employees safe during an emergency.

An emergency action plan (EAP) is a written document required by OSHA standard 1910.38. The purpose of an EAP is to facilitate and organize employer and employee actions during workplace emergencies.

Well-developed emergency plans and proper employee training (such that employees understand their roles and responsibilities within the plan) will result in fewer and less severe employee injuries and less structural damage to the facility during emergencies. A poorly prepared plan, likely will lead to a disorganized evacuation or emergency response, resulting in confusion, injury, and property damage.

Check out the Safety Whitepaper, Developing an Emergency Action Program here

Emergency action plans must be written. However, for smaller companies, the plan does not need to be written and may be communicated orally if there are 10 or fewer employees. It is recommended that all employers have a written emergency action plan for optimal safety.

Check out the Post: Are Emergency Action Plans Really Necessary?

OSHA Requirements for Emergency Action Plans

At a minimum, the plan must include but is not limited to the following elements:

  • Means of reporting fires and other emergencies,
  • Evacuation procedures and emergency escape route assignments,
  • Procedures for employees who remain to operate critical plant operations before they evacuate,
  • Accounting for all employees after an emergency evacuation has been completed,
  • Rescue and medical duties for employees performing them, and
  • Names or job titles of persons who can be contacted.

Although they are not specifically required by OSHA, employers may find it helpful to include the following in the EAP:

  • A description of the alarm system to be used to notify employees (including disabled employees) to evacuate and/or take other actions. The alarms used for different actions should be distinctive and might include horn blasts, sirens, or even public address systems.
  • The site of an alternative communications center to be used in the event of a fire or explosion.
  • A secure on- or offsite location to store originals or duplicate copies of accounting records, legal documents, your employees’ emergency contact lists, and other essential records.

Evacuation policies, procedures, and escape route assignments are put into place so that employees understand who is authorized to order an evacuation, under what conditions an evacuation would be necessary, how to evacuate, and what routes to take. Exit diagrams are typically used to identify the escape routes to be followed by employees from each specific facility location.

Evacuation procedures also often describe actions employees should take before and while evacuating such as shutting windows, turning off equipment, and closing doors behind them.

Under the typical EAP, the employer will expect all employees to evacuate in an emergency. However, sometimes a critical decision may need to be made when planning – whether employees should be trained and responsible for extinguishing small (controllable) fires.

A disorganized evacuation can result in confusion, injury, and property damage. When developing the emergency action plan, it is important to determine the following:

  • conditions under which an evacuation would be necessary.
  • conditions under which it may be better to shelter-in-place.
  • a clear chain of command and designation of the person in your business authorized to order an evacuation or shutdown.
  • specific evacuation procedures, including routes and exits.
  • specific evacuation procedures for high-rise buildings for employers and employees.
  • procedures for assisting visitors and employees to evacuate, particularly those with disabilities or who do not speak English.
  • designation of what, if any, employees will remain after the evacuation alarm to shut down critical operations or perform other duties before evacuating.
  • a means of accounting for employees after an evacuation.
  • special equipment for employees.
  • appropriate respirators.

During development and implementation of a draft plan, think about all possible emergency situations and evaluate the workplace to see if it complies with OSHA’s emergency standards.

Exit Routes

Normally, a workplace must have at least two exit routes to permit prompt evacuation of employees and other building occupants during an emergency. More than two exits are required if the number of employees, size of the building, or arrangement of the workplace will not allow employees to evacuate safely. Exit routes must be located as far away from each other as practical in case one exit is blocked by fire or smoke.

Exception: If the number of employees, the size of the building, its occupancy, or the arrangement of the workplace allows all employees to evacuate safely during an emergency, one exit route is permitted.

Most employers create maps from floor diagrams with arrows that designate the exit route assignments. These maps should include locations of exits, assembly points, and equipment (such as fire extinguishers, first aid kits, spill kits) that may be needed in an emergency. Exit routes should be:

  • clearly marked and well lit,
  • wide enough to accommodate the number of evacuating personnel,
  • unobstructed and clear of debris at all times, and
  • unlikely to expose evacuating personnel to additional hazards.

When preparing drawings that show evacuation routes and exits, post them prominently for all employees to see. See OSHA’s Interactive Floorplan Demonstration.

Accounting for Employees

Procedures to account for employees after the evacuation to ensure that everyone got out may include designating employees to sweep areas, checking offices and restrooms before being the last to leave a workplace or conducting a roll call in the assembly area. Evacuation wardens can be helpful in accounting for employees. To ensure the fastest, most accurate accounting of employees, consider including these steps in the EAP:

  • Designate assembly areas or areas Assembly areas, both inside and outside the workplace, are the locations where employees gather after evacuating.
    • Internal assembly areas within the building are often referred to as “areas of refuge.” Make sure the assembly area has sufficient space to accommodate all employees.
    • Exterior assembly areas, used when the building must be partially or completely evacuated, are typically located in parking lots or other open areas away from busy streets. Try and designate assembly areas so that employees will be up-wind of the building.
  • Take a head count after the evacuation. Accounting for all employees following an evacuation is critical. Identify the names and last known locations of anyone not accounted for and pass them to the official in charge.
  • Assembly area design. When designating an assembly area, consider (and try to minimize) the possibility of employees interfering with rescue operations.
  • Account for others. Establish a method for accounting for non-employees such as suppliers and customers.
  • Additional evacuation. Establish procedures for further evacuation in case the incident expands. This may consist of sending employees home by normal means or providing them with transportation to an offsite location.